Trolling with Strip Baits
1. Introduction
There are actually several kinds of strip baits you can make although the best known in Thailand where I learned my trade is the Panama strip bait, cut from the belly section of a Dolphin, small Tuna or Rainbow runner. These are extremely tough, an excellent choice for fly fishing teasers. Florida strip baits are cut from the belly section of small Tuna or Dolphin in a willow leaf shape. These need pin rigs to hold them properly and are not very popular although Phil Watkins, skipper of ‘Wahoo’ at Phuket feels that they can be even more effective than Panama strips. I have also seen Florida strips cut from Squid, very interesting. Lastly, Mullet strips. These are cut from the flank of a Mullet much like a fillet, but including half a tail (much like cutting the tail of a split-tail Mullet).
2. First catch your bait
Fresh bait is by far the best. Tuna deteriorates very quickly. When I was at Phuket, we would run small squids or bonito feathers on the way out to the sailfish grounds in order to catch small tuna and school dolphin. Use very small lures and light leaders for maximum success.
3. Ice your bait
You have to ice down the bait in order to make the flesh more firm. If you cut the tuna straight away, the meat is too soft. Lay the bait on ice for about one hour. You can also cut the belly section and salt it and lay it on ice, but I prefer to lay the whole fish on ice and then cut it after it’s chilled.
4. Cutting the belly section
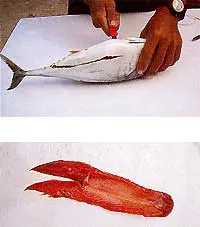
Some people prefer to cut their tuna in front of the anal fin and finish off just behind the pectoral fins. I prefer to begin the cut just behind the anal fin and carry on all the way to the throat latch. This gives several advantages. The throat latch meat is extremely tough and strong. The pectoral fins also act to stabilize the bait.
Some Australian deckhands actually stitch the pectoral fins so they stick out like the wings of a flying fish. I don’t recommend this unless you are trolling hookless teasers for fly fishing. The stuck-out fins make it hard for the fish to swallow the bait. Lastly, you can cut out the anal fin once the belly is cut out, creating a forked tail which wiggles appealingly.
Florida strip baits are cut in willow leaf form from the belly meat. If you are going to make Florida strips, cut out as much of the belly section as you can. For Panama strips, cut a slimmer profile.
Knives must be very sharp. The edges of the strip baits have
to be cut very cleanly.

5. Hooks and leaders
For Panama baits, simply crimp a length of cable or mono leader to the hook and finish the other end as normal. Cable is better when there are lots of toothy critters about. For shy sailfish, we sometimes have to drop down to 80 pound mono in order to get strikes. Hooks for Panama rigs need to be fairly large to clear the bait when it’s stitched. I like a 7/0 to 8/0 O’Shaughnessy (Mustad 34007) because it’s easy to sharpen and penetrate on light tackle. If you are preparing the bait for King mackerel or other toothy fish, use gang hooks. Florida strips are smaller, so use a smaller hook. A 5/0 or 6/0 Mustad 10827BLN live bait pattern is excellent. You will also have to twist some heavy wire on the hook shank to pin the strip and hold the bait in the water.

6. Stitching the Panama bait
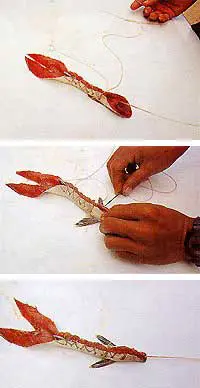
Panama baits are stitched together edge to edge. The best stitching string is heavy waxed rigging floss. Pull out an adequate length of floss and pass the needle through the cartilage right at the front of the bait above the pectoral fins. This is the strongest part of the bait.
Pass the needle through the leader loop. Repeat, the loop, not the eye of the hook. Pass the needle out the other side of the bait. Stitches should go across the bait and enter the bait from the other side. Some people stitch the bait all the way down to the tail. I prefer to stitch until where the hook comes out of the bait, leaving a forked tail for more wiggle. Stitch back up. The stitches must close the bait firmly and be deep enough so that they cannot easily be torn out. The stitch pattern along the top of the bait should look like a row of Xs.
Note 1: Do not drive the hook through the belly of the bait. The hook should lay on top of the bait with the hook facing the other way. When the bait is stitched, the hook point rides up. This procedure sounds intimidating but it’s easy in practice. After you have done a few you should get the hang of it.
Note 2: If you are making a teaser for fly fishing, make extra stitches to hold the bait together and also around the leader loop to avoid the teaser being torn off by a hungry fish.
Note 3: The best needles to use for all bait rigging are the Stainless steel type with three cutting edges, known as Morticians needles.
7. Florida strips
These are simply be pinned on to the wire. Run the hook through the strip bait so that it runs flat otherwise the strip will twist when trolled.
8. Striking procedure
If the strip baits are rigged with gang hooks for mackerel, set the reel in strike drag and try and hook them up instantly. For sailfish, using mono leaders with single hooks, set the reel drag light. Let the fish take out line until it’s running quickly, then push the reel to strike and reel until line is coming off under drag tension, then strike a several times.
9. Squid skirts
These can be quite useful for tracking the baits more easily. You can also pull a strip bait faster with the squid skirt. Bright colours like pink, fluoro green and orange are excellent. Sailfish seem to like pink skirts. Choose a squid big enough to accomodate the head of the bait. Sometimes, a squid skirt with an egg sinker stuffed into the head is useful for making the strip bait run below the surface. Good for king mackerel, but I like a surface-running bait for Sailfish.
10. Fresh baits
Change your baits regularly. Panama baits can last for about 2 hours before losing flavour, but replace them every hour if you can. Sailfish in particular respond much better to good, fresh baits.
Article written by Dustin Foo
Always remember to test all knots before fishing
Good Fishing!


